| | | |
|
Essential for the Strength, Stability and Longevity
of the Multi-Sport Athlete
Unique challenges arise when triathletes pursue strength training in addition to their required swimming, biking and running regimens. Because of the demand on their training time, triathletes need to consider maximizing strength without risking overtraining.
For triathletes, strength must be converted into power to be effective. Two of the best and most traditionl methods of training for power are the use of explosive lifts and plyometrics. The most specific conversion sessions for a traithlete would involve swimming, cycling and running against high resistance with relatively low rpm' (such as cycling and running up steep grades, or swimming with a drag suit or other resistance tool). And because of the time demands of a triathlete, it is important to have an aresenal of bodyweight exercises that can be performed anytime and anywhere with minimal equipment or gear.
One training component multi-sport athletes should focuse on is stabilization. This is the body's ability to control movement efficiently, and provide a stable platform from which the limbs can efficiently move and perform. For triathletes, this means training the stability of the lower limbs, torso and shoulders.
These exercises we have selected require stabilization, are power-based, and have definitive acceleration and deceleration components. After all, it is important for multi-sport athletes to train movements, not muscles.
Three-Way One-Legged Deadlift
1. Root your foot onto the ground. In order to complete a successful rep you must have all 5 toes on your stabilizing leg and your heel firmly planted on to the floor.
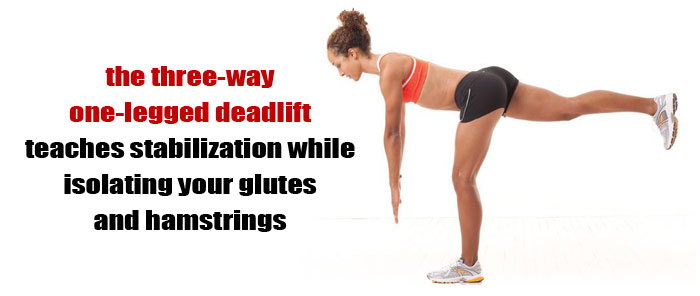
2. Slowly hinge your hips back while also hinging your knee until you have a very flat back. (Do not round your back)
3. The moving leg should be straight out behind you with minimal knee bend to keep your spine aligned properly. Remember that the torso and the back leg have a seesaw relationship so the higher your back leg goes, the lower your chest goes, being careful to never let your chest drop lower than your hips.
4. As you hinge back and sit deep into the single deadlift position, reach for the outside of your stabilizing foot. Note: Do not look down at your foot; your vision should be straight ahead or on the floor..
5. Make sure your shoulder is pulled back so your lat engages properly during the entire movement.
6. Hinge your hip forward while bringing your arms back with you. Lock out your stabilizing leg and squeeze your glute.
 See Video Demonstration (weights optional) See Video Demonstration (weights optional)
Push Your Limits: For more difficulty, perform these movements with a kettleball in one hand.
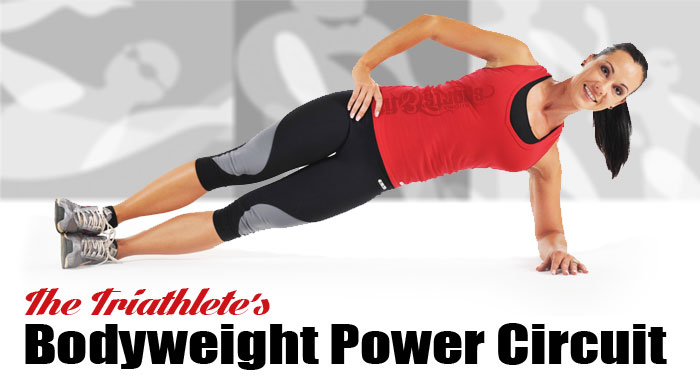
Side Plank Hip Raises
Research shows that weakness in the muscles that support the hips may contribute to many overuse injuries in runners and triathletes. Put simply, if the hip abductors (the muscles that move the lower leg sideways away from the body) and the hip flexors (muscles that move the lower leg in toward the body) are weak, the knee doesn't track as it should.
1. Begin in a side plank position, anchored by your bottom foot and your elbow just under your shoulder (see photo at top of page). Be sure to keep your body straight from head to toe.
2. Hold this position for a count of 15 seconds
3. Slowly lower your hip to the floor and rest 8 seconds.
4. Perform 10 repetitions.
5. Switch sides and repeat the exercise on the other hip.
You can increase the difficulty and impact of this exercise by lifting the top leg up toward the ceiling. Repeat the leg lift 10 times slowly and return to the start position.
See Video Demonstration
See Video Demonstration (leg lift)
Push Your Limits: For more difficulty, perform these movements on one hand rather than your elbow.
Modified / Plyometric Push Ups
Staggered push-ups. After getting into a regular shoulder-width push-up position, Stagger your hands, offsetting them by approximately 8 inches. Perform 4 sets of 20 in varied bottom/top positions (can also be done kneeling).
Incline and decline push-ups. Modifying the angle of your push-ups will challenge your muscles to work in multiple ranges, meaning that possibly underutilized portions of your upper body will be challenged. For example, to prioritize the middle and lower fibers of your chest, do push-ups with your hands on the edge of a sofa or bench, feet on the floor. To prioritize the upper fibers of your chest and shoulders, do push-ups with your toes on the sofa and hands on the floor.
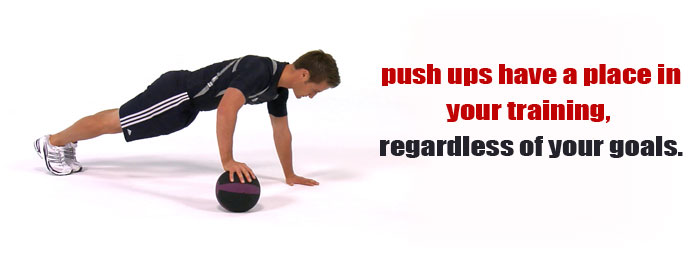
Plyometric Push Ups. The ultimate goal of plyometrics is to maximize muscle contraction quickly, which essentially means that a byproduct of plyometric training is that you will develop power. Obviously having a high level of physical power is desirable in any sport, but in order to increase your power as a multi-sport athlete, you need to strengthen the muscle fibers that are responsible for converting strength into speed.
1. In normal push-up position, place your right hand on top of a medicine ball and your left hand on floor (slightly wider than shoulder width apart).
2. Position your upper body above both hands with your left arm straight and your right arm bent with hand on ball.
3. Lower your body until you feel a slight stretch in your shoulder or chest. Immediately push body up rapidly!
4. (Switch hands) As your left arm straightens and raises above the floor, rapidly roll the ball under your left hand with the right hand. Land left hand on the ball while quickly placing your right hand on floor, slightly wider than shoulder width.
5. Repeat this movement, alternating hands in a controlled, but powerful movements. Be sure to keep your hips and waist straight.
As with any plyometric exercise, joints (particularly shoulders in this case) should be free of any biomechanical deficiencies. When executed properly and used in reasonable volume, plyometrics help prevent injury and improve performance. But poor form, misguided progressions, or too much volume can lead to injury.
See Video Demonstration
Push Your Limits: To increase the demands on your core, try T push-ups. As you push yourself up, rotate your left arm and torso to the right (a complete side plank position). Slowly return your arm to the floor. Repeat, rotating left.
Single-leg exercises engage smaller muscles like the abductors, gluteus medius, and quadratus lumborum in ways we can't duplicate training two legs at a time. This translates into more balanced growth and development.
1. Begin by standing straight and balancing on one foot.
2. Slowly squat down, bending at the knee and sitting your hips back as if you are going to sit in a chair behind you.
3. Once down to about a 115 to 90 degree angle in your knee, powerfully extend your leg back up to standing. If this is too challenging, allow the toes of your hovering foot to lightly rest on the ground.
4. Complete 10 to 12 repetitions, then switch to the other leg.
5. Struggling to balance yourself? Do this movement with your arms extended out in front of your body, use TRX suspension cables to leverage yourself, or try holding lightweight dumbbells with your arms extended to provide counterbalance.
See Video Demonstration
Push Your Limits: As you perfect the form and skill of sing;e-leg squats, you can slowly add a weighted vest or kettleball to the exercise.
Mountain Climbers
Mountain climbers are a full body workout that, when done correctly and powerfully, can engage most muscles in the body (and burn significant calories in a short amount of time). Specifically, mountain climbers focus on deltoids, biceps, pectoralis major, triceps, onbliques, rectus abdominals, lower trapezius, latissimus dorsi, hamstrings, quadriceps, hip adductors, and hip abductors.

1. To begin, get into a push-up position, with one leg straight and the opposite leg bent to about 90 degrees. Your body should form a straight line from your shoulders to your ankles
2. Lift your right foot off the floor and slowly raise your knee as close to your chest as you can.
3. Return to the starting position and repeat with your left leg. Both feet leave the ground as you switch to the opposite position continuously.
4. Perform 4 sets of 20 repetitions, or set time goals.
If you are new to mountain climbers perform the knee to chest motion slow and steadily then build it up to a faster pace with practice.
See Video Demonstration
Push Your Limits: Try placing your hands on an elevated platform such as a step. This will make the mountain climbers more difficult.
|
|
|
|
|
|
|
|


